Cpanel Cron Job

Introduction to Cpanel Cron Job

Cpanel is a popular web hosting control panel that provides a user-friendly interface for managing various aspects of a website, including email, files, and databases. One of the powerful features of Cpanel is the ability to schedule tasks to run automatically at specified intervals using cron jobs. In this blog post, we will explore the world of Cpanel cron jobs, including what they are, how to create and manage them, and some best practices for using them effectively.
What is a Cron Job?

A cron job is a timed job that runs a specific command or script at a specified interval, which can be minutes, hours, days, or even years. The cron daemon, a background process, executes the jobs at the specified times. Cron jobs are commonly used for tasks such as:
- Backing up databases or files
- Sending automated emails or reports
- Updating software or plugins
- Running scripts or programs
Creating a Cron Job in Cpanel

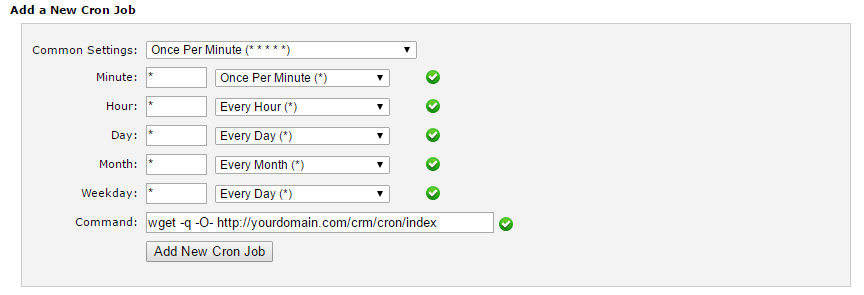
To create a cron job in Cpanel, follow these steps:
- Log in to your Cpanel account
- Click on the “Cron Jobs” icon in the “Advanced” section
- Click on the “Create a New Cron Job” button
- Enter the command or script you want to run, along with the email address where you want to receive the output
- Specify the interval at which you want the job to run, using the “Minute”, “Hour”, “Day”, “Month”, and “Weekday” fields
- Click on the “Add New Cron Job” button to save the job
| Field | Value |
|---|---|
| Command | /usr/bin/php /path/to/your/script.php |
| your_email@example.com | |
| Minute | 0 |
| Hour | 2 |
| Day | |
| Month | |
| Weekday | * |

Managing Cron Jobs in Cpanel

Once you have created a cron job, you can manage it by editing or deleting it. To edit a cron job, follow these steps:
- Log in to your Cpanel account
- Click on the “Cron Jobs” icon in the “Advanced” section
- Find the cron job you want to edit and click on the “Edit” button next to it
- Make the necessary changes to the command, email, or interval
- Click on the “Save Changes” button to save the updated job
- Log in to your Cpanel account
- Click on the “Cron Jobs” icon in the “Advanced” section
- Find the cron job you want to delete and click on the “Delete” button next to it
- Confirm that you want to delete the job by clicking on the “Delete” button
🚨 Note: Be careful when deleting cron jobs, as this can affect the functionality of your website or applications.
Best Practices for Using Cron Jobs in Cpanel

Here are some best practices to keep in mind when using cron jobs in Cpanel:
- Test your cron jobs before scheduling them to run automatically
- Use descriptive names for your cron jobs to make them easy to identify
- Specify the correct email address for receiving output and errors
- Avoid overloading your server with too many cron jobs running at the same time
- Monitor your cron jobs regularly to ensure they are running correctly and not causing issues
To summarize the key points, Cpanel cron jobs are a powerful tool for automating tasks and improving the efficiency of your website or applications. By understanding how to create, manage, and use cron jobs effectively, you can take your website management to the next level. Whether you are a beginner or an experienced user, Cpanel cron jobs can help you streamline your workflow and achieve your goals.
What is the purpose of a cron job in Cpanel?

+
A cron job in Cpanel is used to schedule tasks to run automatically at specified intervals, such as backing up databases or files, sending automated emails, or updating software.
How do I create a new cron job in Cpanel?

+
To create a new cron job in Cpanel, log in to your account, click on the “Cron Jobs” icon, and then click on the “Create a New Cron Job” button. Enter the command or script you want to run, along with the email address where you want to receive the output, and specify the interval at which you want the job to run.
What are some best practices for using cron jobs in Cpanel?

+
Some best practices for using cron jobs in Cpanel include testing your cron jobs before scheduling them to run automatically, using descriptive names for your cron jobs, specifying the correct email address for receiving output and errors, avoiding overloading your server with too many cron jobs, and monitoring your cron jobs regularly to ensure they are running correctly.


